
Downloads - Content
Admin Companion - Public Key
Public key to check signed packages:
admin-companion-2025_public.keyfile_download
Client Software
Release Notes
29 April 2026: Version 6.3-6
Interactive client (ai)
- Dialogue history handling: Fixed an issue where truncated dialogue history was not always saved correctly.
Interactive client (ai) and guard-railed automation client (ac-ops)
- Debian 11 compatibility: Fixed compatibility issues affecting Debian 11 builds.
23 March 2026: Version 6.2-13
Interactive client (ai)
-
Web Page Fetching and Extraction:
aican now fetch web pages either as raw HTML or as extracted text (converted to Markdown). This enables deeper research than web search snippets, without having to usecurl. - Dialogue History Management: Fixed an issue in dialogue history management, when multiple tools were called in one round trip.
10 March 2026: Version 6.1-8
-
MAJOR ENHANCEMENT: Released Admin Companion Gateway (separate package)
Admin Companion Gateway is a lightweight webhook receiver and router that turns incoming events (for example Prometheus Alertmanager) into secure, policy-enforced remote automation runs viaac-ops:- Webhook in, action out: receives HTTP events, normalizes them via
profiles.yaml, and routes them to the right target host and use-case. - Secure remote execution: invokes
ac-opson target hosts via SSH forced-command mode (ac-ops --ssh-restricted), so the target host stays in control. - Policy enforcement: gateway validates
target_hostanduse_case(allow/deny), andac-opsenforces tool allowlists and per-parameter restrictions (least privilege). - Post-actions (sinks): can return the
ac-opsoutput and/or trigger integrations (sinks) such as ServiceNow or Slack. - Highly configurable: adapts to many input and output systems via configuration (no custom software development required).
- Read more: Gateway documentation
- Webhook in, action out: receives HTTP events, normalizes them via
-
Interactive client (
Improved multi-action confirmations: When the LLM requests multiple commands and/or web searches in one response, confirmations are now prompted immediately after each streamed result completes.ai) -
Guard-railed automation client (
Addedac-ops)--ssh-restrictedmode for SSH forced-command execution (used by the new Admin Companion Gateway). In this mode, ac-ops reads arguments from SSH_ORIGINAL_COMMAND and typically receives the event payload via stdin (--event -).
24 February 2026: Version 6.0-8
-
MAJOR ENHANCEMENT: Added guard-railed automation client
ac-opsfor server operations and DevOpsac-opsbrings Admin Companion to automation and incident-response workflows with full control and auditability:- Policy-first execution: only explicitly allowed tools can run; per-parameter restrictions (allow/deny, deny wins) enforce least privilege.
- Security-by-design tools: sensitive operations use built-in guarded handlers (example:
FileQuery), with bounded output and strict limits. - Transparent execution trail: optional JSONL debug and audit logs capturing context + tool activity (
tool_call,tool_exec,tool_result) and errors. - Safe for pipelines: predictable stdout output (text or json) plus an optional
--debug-consoletranscript for troubleshooting. - Separate binary: delivered as a dedicated binary intended for ops-only automation scenarios.
- Read more: See ac-ops documentation for more details.
- Vendor provided tools: In this version we provide read-only tools for:
ls, file query, journalctl, systemctl, and docker investigation - Easy extension: You can easily extend tools yourself. Or use our consulting services to develop custom tools for you.
-
Internal refactoring - alignment with new ac-ops client workflow
Major internal cleanup and shared tool-loop foundations for interactive usage and automated operations.
aiCLI change: version flag moved from-vto-V. -
Context storage improvements (Remember/Forget)
Remember/Forgetno longer stop the iteration loop and now behave consistently inside long tool runs.
Rememberalso reports which memory slot was used for the newly stored item.
See installation procedure further down on this page.
Remarks for version upgrade
To upgrade the client from an older version, you can use the same procedure as for a fresh installation. The client will be updated automatically.
Remark: You need an Admin Companion account and Admin Companion API key to use the client.
Packages for Debian based Operating Systems
| Architecture | Package | Good for |
|---|---|---|
|
AMD64 (for Intel and AMD) |
admin-companion_6.3-6_amd64.deb file_download |
 Kali Linux 2022.4 and later Kali Linux 2022.4 and later Other Linux distributions based on Debian 12 or 13 or Ubuntu 22.10 and later Other Linux distributions based on Debian 12 or 13 or Ubuntu 22.10 and later
|
|
AMD64 (for Intel and AMD) |
admin-companion_6.3-6_backport_deb11_amd64.deb file_download |
Kali Linux 2020.1 - 2022.03 Other Linux distributions based on Debian 11 or Ubuntu 20.04 - 21.10
|
|
ARM64 (AARCH64) |
admin-companion_6.3-6_arm64.deb file_download |
Kali Linux 2022.4 and later Other Linux distributions based on Debian 12 or 13 or Ubuntu 22.10 and later
|
|
ARM64 (AARCH64) |
admin-companion_6.3-6_backport_deb11_arm64.deb file_download |
Kali Linux 2020.1 - 2022.3 Other Linux distributions based on Debian 11 or Ubuntu 20.04 - 21.10
|
Package for RedHat / Fedora
| Architecture | Package | Good for |
|---|---|---|
|
AMD64 (for Intel and AMD) |
admin-companion-6.3-6.el8.x86_64.rpm file_download |
 Fedora Versions 37 and later Fedora Versions 37 and later
|
Package for FreeBSD
| Architecture | Package | Good for |
|---|---|---|
|
AMD64 (for Intel and AMD) |
admin-companion-6.3-6_amd64.pkg file_download Detached ASCII-armored GPG signature: admin-companion-6.3-6_amd64.pkg.asc file_download |
|
Installation procedures
Kali Linuxand
Other Debian based Linux
wget https://www.admin-companion.ai/static/downloads/<your needed package>
For example: wget https://www.admin-companion.ai/static/downloads/admin-companion_6.3-6_amd64.deb
                        wget https://www.admin-companion.ai/static/downloads/admin-companion-2025_public.key

                        gpg --import admin-companion-2025_public.key

                        gpg --verify <your downloaded installation package file name>
You get multiple lines. One line should show:
Good signature from "Admin Companion 2025 - ayonik GmbH <admin-companion@admin-companion.ai>"
...then validation is successful. You can ignore the warning message. We use a self signed signature. Just be sure, you have downloaded the public key from our website.
sudo dpkg -i <your needed package>
For fresh installations (if you don't upgrade an existing version):
- Request an API key on the API keys page from the Admin Companion web console (you need to log in to access the page).
-
Create the file
$HOME/.admin-companion/api-key(Do not forget the dot "." in the path name)
with this content
ADMIN_COMPANION_KEY="<Your API key>" -
Make sure, your system can reach this destination:
https://api.admin-companion.ai:443
ai "Are you there?
and
wget https://www.admin-companion.ai/static/downloads/<your needed package>
For example:
wget https://www.admin-companion.ai/static/downloads/admin-companion-6.3-6.el8.x86_64.rpm
sudo dnf install wget
                        wget https://www.admin-companion.ai/static/downloads/admin-companion-2025_public.key

                        sudo rpm --import admin-companion-2025_public.key

                        rpm -K <your downloaded installation package file name>
You should get this:
<your downloaded installation package file name>: digests signatures OK
then validation is successful.
If you don't see the
digests
or you don't see the
signatures
--> Then something is wrong.
sudo dnf install <your needed package>
For example:
sudo dnf install admin-companion-6.3-6.el8.x86_64.rpmFor fresh installations (if you don't upgrade an existing version):
- Request an API key on the API keys page from the Admin Companion web console (you need to log in to access the page).
-
Create the file
$HOME/.admin-companion/api-key(Do not forget the dot "." in the path name)
with this content
ADMIN_COMPANION_KEY="<Your API key>" -
Make sure, your system can reach this destination:
https://api.admin-companion.ai:443
ai "Are you there?
wget https://www.admin-companion.ai/static/downloads/<your needed package>
For example:
wget https://www.admin-companion.ai/static/downloads/admin-companion-6.3-6_amd64.pkg
sudo pkg install wget
(You can install gpg with
sudo pkg install gnupg
if not yet installed)
                        wget https://www.admin-companion.ai/static/downloads/admin-companion-2025_public.key

                        wget https://www.admin-companion.ai/static/downloads/admin-companion-6.3-6_amd64.pkg.asc

                        gpg --import admin-companion-2025_public.key


                          gpg --verify admin-companion-6.3-6_amd64.pkg.asc admin-companion-6.3-6_amd64.pkg
You get multiple lines. One line should show:
Good signature from "Admin Companion 2025 - ayonik GmbH <admin-companion@admin-companion.ai>"
...then validation is successful. You can ignore the warning message. We use a self signed signature. Just be sure, you have downloaded the public key from our website.
sudo pkg install <your needed package>
For example:
sudo pkg install admin-companion-6.3-6_amd64.pkgFor fresh installations (if you don't upgrade an existing version):
- Request an API key on the API keys page from the Admin Companion web console (you need to log in to access the page).
-
Create the file
$HOME/.admin-companion/api-key(Do not forget the dot "." in the path name)
with this content
ADMIN_COMPANION_KEY="<Your API key>" -
Make sure, your system can reach this destination:
https://api.admin-companion.ai:443
ai "Are you there?
Gateway Software - Downloads
Release Notes
10 March 2026: Version 1.0.0
-
First publicly available version
Admin Companion Gateway consists of these components
- Docker image containing the executable
- Package tarball with
- README.md
- Installation script
- Sample configuration files
- ac-gatewayctl to control the gateway
For an air-gapped server you need both files.
admin-companion-gateway_compose_1.0.0.tar.gz file_download
admin-companion-gateway_compose_1.0.0.tar.gz.asc file_download
admin-companion-gateway_image_1.0.0.tar.gz file_download (for air-gapped servers only)
admin-companion-gateway_image_1.0.0.tar.gz.asc file_download (for air-gapped servers only)
Admin Companion Gateway - Installation Guide
Terminology:
- Target host: the remote machine that is the source of an incoming event (eg an alert) and the machine the gateway connects to via SSH as user
acopsto runac-opsfor inspection.
This document describes how to install Admin Companion Gateway on a Linux host using Docker Compose.
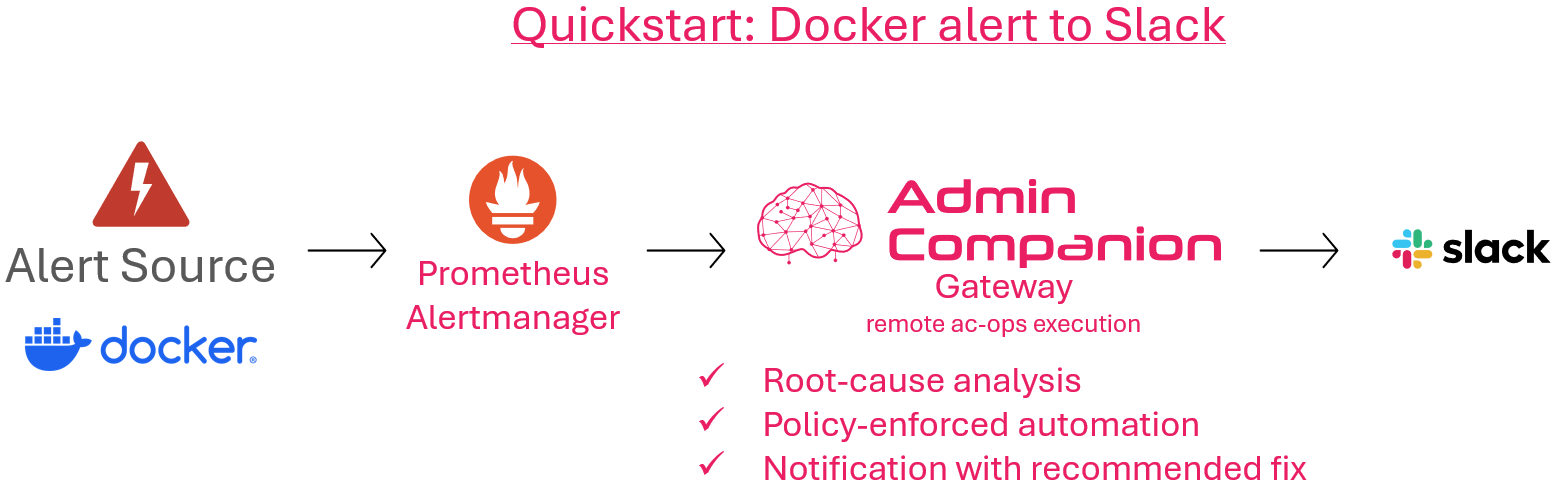
The gateway is intended for intranet deployments. It receives webhooks (eg Prometheus Alertmanager), normalizes JSON payloads via profiles, and executes remote ac-ops use-cases over SSH on target hosts.
Contents
- Prerequisites
- Quickstart: Alertmanager to Slack
- Download
- Install (standard, with Internet access)
- Install (air-gapped)
- Post-install: configure profiles and use-cases
- Target hosts: required setup
- Operate the gateway
- Uninstall
- Troubleshooting
Prerequisites
Gateway host
- Linux host with a working Docker installation.
- Docker Compose available as either:
docker compose(Compose v2 plugin), ordocker-compose
- Outbound SSH connectivity from the gateway host to the target hosts.
Notes:
- The container runs as a non-root UID (20102). Host-mounted secrets must be readable by that UID.
Target hosts
Each target host that the gateway is allowed to execute against must provide:
- Admin Companion installed (so
ac-opsexists on the target) - An OS user
acops - SSH access for the gateway (public key auth) with restrictions
- The referenced use-case YAML files present in allowed use-case directories
Quickstart: Alertmanager to Slack
This quickstart wires Prometheus Alertmanager - gateway - ac-ops - Slack using the shipped example profile.
Requirements:
- Prometheus Alertmanager
- A Slack Incoming Webhook URL
Steps (high level):
1) Install and start the gateway (see below).
2) Edit the installed profiles file and set your Slack webhook URL:
- `/etc/admin-companion/ac-ops-gateway.profiles.yaml`
3) Configure Alertmanager to send alerts to the gateway endpoint.
The required Alertmanager receiver snippet is included as comments in the same profiles file.
4) Ensure the target hosts are prepared (SSH user acops, forced command mode, and required use-cases available).
The quickstart profile uses docker-issue-analysis.yaml (shipped with the Admin Companion client / ac-ops).
5) Restart the gateway after changes:
sudo ac-gatewayctl restart
For configuration details (expression language, sinks, templating, security), see:
https://www.admin-companion.ai/documentation?sub=ac-gw#ac-gw
Download
You will typically download one or both of these artifacts:
-
Compose bundle:
admin-companion-gateway_compose_<version>.tar.gzadmin-companion-gateway_compose_<version>.tar.gz.asc(optional detached signature)
-
Image archive (only needed for air-gapped installs):
admin-companion-gateway_image_<version>.tar.gzadmin-companion-gateway_image_<version>.tar.gz.asc(optional detached signature)
Optional: verify detached signature (.asc)
If you received detached signatures, you can verify them (example):
wget https://www.admin-companion.ai/static/downloads/admin-companion-2025_public.key
gpg --import admin-companion-2025_public.key

gpg --verify admin-companion-gateway_compose_<version>.tar.gz.asc \
            admin-companion-gateway_compose_<version>.tar.gz
Repeat the same for the image tarball if you downloaded it.
Note about the GPG warning
When verifying signatures you might see:
gpg: WARNING: This key is not certified with a trusted signature!
gpg:          There is no indication that the signature belongs to the owner.
This is normal. It does not mean the download is corrupted.
gpg: Good signature ...means the file matches the signature (integrity OK).- The warning only means GPG has not been told to trust this signing key on your machine yet (Web-of-Trust / local trust database).
Install (standard, with Internet access)
This uses the published image from GHCR (ghcr.io/ayonik-gmbh/admin-companion-gateway:<version>).
1) Extract the compose bundle
tar -xzf admin-companion-gateway_compose_<version>.tar.gz
cd admin-companion-gateway_compose_<version>
2) Run the installer
sudo ./install.sh
What it does:
- Installs the compose stack to
/opt/admin-companion-gateway/ - Installs config templates (only if missing) to
/etc/admin-companion/ - Creates secrets directory
/etc/admin-companion/ac-ops-gateway-secrets/with strict permissions - Generates in the secrets directory (if missing):
- bearer token:
ac_ops_gateway_token - SSH keypair:
acops_gateway_ed25519/.pub - empty
known_hosts
- bearer token:
- Installs
ac-gatewayctlto/usr/local/bin/ac-gatewayctl
3) Start the gateway
sudo ac-gatewayctl up -d
4) Check status/logs
sudo ac-gatewayctl ps
sudo ac-gatewayctl logs -f
Install (air-gapped)
Air-gapped means the target machine cannot pull from GHCR.
Additional step (before the normal installation): load the image into Docker.
1) Transfer both files to the target machine:
- `admin-companion-gateway_compose_<version>.tar.gz`
- `admin-companion-gateway_image_<version>.tar.gz`
2) Load the image:
gunzip -c admin-companion-gateway_image_<version>.tar.gz | docker load
If your Docker requires root:
gunzip -c admin-companion-gateway_image_<version>.tar.gz | sudo docker load
3) Continue with the standard procedure
- extract compose bundle
- `sudo ./install.sh`
- `sudo ac-gatewayctl up -d`
Post-install: Configure profiles and use-cases
Gateway config files (general)
After install.sh, you typically edit:
/etc/admin-companion/ac-ops-gateway.cfg/etc/admin-companion/ac-ops-gateway.profiles.yaml
Then restart:
sudo ac-gatewayctl restart
Quickstart: Minimal required changes (Alertmanager - gateway - ac-ops - Slack)
If you follow the quickstart profile, these are the effective changes you must make:
1) Gateway: set Slack webhook URL
- Edit:
/etc/admin-companion/ac-ops-gateway.profiles.yaml - Set your Slack Incoming Webhook URL in the
webhooksink of the shipped Alertmanager profile.
2) Alertmanager: add receiver snippet + configure bearer token
- In the Alertmanager configuration (commonly
/etc/alertmanager/alertmanager.yml), add that receiver and point it to the gateway endpoint. - The receiver snippet template is included as comments in the gateway profiles file:
/etc/admin-companion/ac-ops-gateway.profiles.yaml
- Adapt the
bearer_token_fileparameter to fit the location, where you provide the file. - Recommendation is to copy the file
/etc/admin-companion/ac-ops-gateway-secrets/ac_ops_gateway_token(generated byinstall.sh) to a location, where alertmanager can access it. - Adapt access permissions of the copy, so alertmanager can access it.
-
The Admin Companion file is mode 0600 with UID:GID 20102:20102, so you cannot refer to this file directly.
-
Alert payload requirements (Quickstart profile):
commonLabels.instance(oralerts[0].labels.instance) is used astarget_hostcommonLabels.alertname(orservice/job) is used to select the use-case;acopsdemocontainermissingis only an example alertname- the shipped profile keeps a default use-case (
docker-issue-analysis.yaml) if there is no match
3) Target hosts: required setup
ac-opsinstalled- user
acopswith forced-command SSH mode (ac-ops --ssh-restricted) - required use-case present (quickstart uses
docker-issue-analysis.yaml)
After changes, restart the gateway:
sudo ac-gatewayctl restart
Secrets and permissions
Secrets directory (mounted into the container as /run/secrets):
/etc/admin-companion/ac-ops-gateway-secrets/
Default ownership model (recommended):
- directory:
0700, owned by20102:20102 - token file:
0600, owned by20102:20102 - SSH private key:
0600, owned by20102:20102(required by OpenSSH)
Target hosts: Required setup
1) Install Admin Companion Client (ac-ops must exist)
On each target host:
command -v ac-ops
If ac-ops is missing, install the Admin Companion client package that provides it.
2) Create user acops (recommended)
On each target host, create a dedicated service user and prepare its SSH directory:
# Recommended: dedicated service user without interactive login
id acops >/dev/null 2>&1 || sudo useradd -m -s /usr/sbin/nologin acops

# SSH directory and authorized_keys
sudo install -d -m 0700 -o acops -g acops /home/acops/.ssh
sudo install -m 0600 -o acops -g acops /dev/null /home/acops/.ssh/authorized_keys
If your OS does not provide useradd, use your OS-specific user management tools to create a normal user acops with a home directory.
Optional hardening (recommended): enforce forced-command and disable session features on the sshd side too:
cat <<'EOF' | sudo tee /etc/ssh/sshd_config.d/90-acops-admin-companion.conf >/dev/null
Match User acops
  ForceCommand ac-ops --ssh-restricted
  PermitTTY no
  AllowTcpForwarding no
  X11Forwarding no
  PermitTunnel no
EOF
sudo systemctl reload ssh
3) Install the gateway public key with restrictions
On the gateway host, the public key is located at:
/etc/admin-companion/ac-ops-gateway-secrets/acops_gateway_ed25519.pub
On the target host, append it to:
/home/acops/.ssh/authorized_keys
Recommended restrictions:
- force restricted execution:
command="ac-ops --ssh-restricted"
- disable interactive/session features:
no-pty,no-port-forwarding,no-agent-forwarding,no-X11-forwarding,no-user-rc
Example (replace <PUBKEY> with the literal public key line from the gateway's .../acops_gateway_ed25519.pub):
umask 077
printf '%s\n' 'command="ac-ops --ssh-restricted",no-agent-forwarding,no-port-forwarding,no-pty,no-user-rc,no-X11-forwarding <PUBKEY>' \
  >> /home/acops/.ssh/authorized_keys
chown acops:acops /home/acops/.ssh/authorized_keys
chmod 0600 /home/acops/.ssh/authorized_keys
4) Ensure use-cases exist and are allowed
The gateway will call (on the target):
ac-ops --ssh-restricted --use-case <name> --event -
In ssh-restricted mode, ac-ops only accepts use-cases from allowed directories.
Place your use-case YAML files on the target hosts in the allowed use-case directories (commonly under /etc/admin-companion/ops/use-cases plus vendor libexec paths).
Operate the gateway
ac-gatewayctl is a thin wrapper around compose.
Common commands:
sudo ac-gatewayctl up -d
sudo ac-gatewayctl ps
sudo ac-gatewayctl logs -f
sudo ac-gatewayctl restart
sudo ac-gatewayctl down
sudo ac-gatewayctl pull
Uninstall
Keep config/secrets:
sudo ac-gatewayctl uninstall
Remove everything (dangerous; deletes secrets and removes the gateway image too):
sudo ac-gatewayctl uninstall --purge
Troubleshooting
If port 8080 is already in use
By default, the compose stack publishes the gateway on host port 8080:
ports: ["8080:8080"]
If port 8080 is already used on the gateway host, change the left side (host port) in:
/opt/admin-companion-gateway/docker-compose.yml
Example: publish on host port 18080 instead:
ports:
  - "18080:8080"
Then apply the change:
sudo ac-gatewayctl up -d
Tip: you can check what is currently listening on 8080 with:
sudo ss -ltnp | grep ':8080' || true
Gateway starts but cannot find use-cases
Symptom:
- SSH output contains: ssh-restricted: use-case not found in allowed use-case dirs
Fix: - Ensure the use-case exists on the target host under allowed use-case directories. - Ensure the requested use-case name matches exactly.
Webhook sink returns HTTP 400 (eg Slack)
- Check
sink_done.detailandsink_done.paramsin DEBUG logs. - For Slack incoming webhooks, the request body must be valid JSON (eg
{"text":"..."}) and should use JSON-escaped template insertions.
Enable debug logging (gateway)
In /etc/admin-companion/ac-ops-gateway.cfg:
AC_OPS_GATEWAY_LOG_LEVEL=DEBUG
To log full request input/output, also set:
AC_OPS_GATEWAY_LOG_FULL_INPUT=trueAC_OPS_GATEWAY_LOG_FULL_OUTPUT=true
Important: full input/output logging is allowed only with DEBUG.