
Downloads - Inhalt
Admin Companion - Public Key
Öffentlicher Schlüssel zum Prüfen signierter Pakete:
admin-companion-2025_public.keyfile_download
Client Software
Release Notes
29 April 2026: Version 6.3-6
Interactive client (ai)
- Dialogue history handling: Fixed an issue where truncated dialogue history was not always saved correctly.
Interactive client (ai) and guard-railed automation client (ac-ops)
- Debian 11 compatibility: Fixed compatibility issues affecting Debian 11 builds.
23 March 2026: Version 6.2-13
Interactive client (ai)
-
Web Page Fetching and Extraction:
aican now fetch web pages either as raw HTML or as extracted text (converted to Markdown). This enables deeper research than web search snippets, without having to usecurl. - Dialogue History Management: Fixed an issue in dialogue history management, when multiple tools were called in one round trip.
10 March 2026: Version 6.1-8
-
MAJOR ENHANCEMENT: Released Admin Companion Gateway (separate package)
Admin Companion Gateway is a lightweight webhook receiver and router that turns incoming events (for example Prometheus Alertmanager) into secure, policy-enforced remote automation runs viaac-ops:- Webhook in, action out: receives HTTP events, normalizes them via
profiles.yaml, and routes them to the right target host and use-case. - Secure remote execution: invokes
ac-opson target hosts via SSH forced-command mode (ac-ops --ssh-restricted), so the target host stays in control. - Policy enforcement: gateway validates
target_hostanduse_case(allow/deny), andac-opsenforces tool allowlists and per-parameter restrictions (least privilege). - Post-actions (sinks): can return the
ac-opsoutput and/or trigger integrations (sinks) such as ServiceNow or Slack. - Highly configurable: adapts to many input and output systems via configuration (no custom software development required).
- Read more: Gateway documentation
- Webhook in, action out: receives HTTP events, normalizes them via
-
Interactive client (
Improved multi-action confirmations: When the LLM requests multiple commands and/or web searches in one response, confirmations are now prompted immediately after each streamed result completes.ai) -
Guard-railed automation client (
Addedac-ops)--ssh-restrictedmode for SSH forced-command execution (used by the new Admin Companion Gateway). In this mode, ac-ops reads arguments from SSH_ORIGINAL_COMMAND and typically receives the event payload via stdin (--event -).
24 February 2026: Version 6.0-8
-
MAJOR ENHANCEMENT: Added guard-railed automation client
ac-opsfor server operations and DevOpsac-opsbrings Admin Companion to automation and incident-response workflows with full control and auditability:- Policy-first execution: only explicitly allowed tools can run; per-parameter restrictions (allow/deny, deny wins) enforce least privilege.
- Security-by-design tools: sensitive operations use built-in guarded handlers (example:
FileQuery), with bounded output and strict limits. - Transparent execution trail: optional JSONL debug and audit logs capturing context + tool activity (
tool_call,tool_exec,tool_result) and errors. - Safe for pipelines: predictable stdout output (text or json) plus an optional
--debug-consoletranscript for troubleshooting. - Separate binary: delivered as a dedicated binary intended for ops-only automation scenarios.
- Read more: See ac-ops documentation for more details.
- Vendor provided tools: In this version we provide read-only tools for:
ls, file query, journalctl, systemctl, and docker investigation - Easy extension: You can easily extend tools yourself. Or use our consulting services to develop custom tools for you.
-
Internal refactoring - alignment with new ac-ops client workflow
Major internal cleanup and shared tool-loop foundations for interactive usage and automated operations.
aiCLI change: version flag moved from-vto-V. -
Context storage improvements (Remember/Forget)
Remember/Forgetno longer stop the iteration loop and now behave consistently inside long tool runs.
Rememberalso reports which memory slot was used for the newly stored item.
Die Installationsanleitung finden Sie weiter unten auf dieser Seite.
Hinweise zum Versions-Upgrade
Um den Client von einer älteren Version zu aktualisieren, können Sie dieselbe Vorgehensweise wie bei einer Neuinstallation verwenden. Der Client wird automatisch aktualisiert.
Hinweis: Sie benötigen ein Admin Companion Konto und einen Admin Companion API-Key, um den Client zu verwenden.
Pakete für Debian-basierte Betriebssysteme
| Architektur | Paket | Geeignet für |
|---|---|---|
|
AMD64 (für Intel und AMD) |
admin-companion_6.3-6_amd64.deb file_download |
 Kali Linux 2022.4 und neuer Kali Linux 2022.4 und neuer Andere Linux-Distributionen auf Basis von Debian 12 oder 13 oder Ubuntu 22.10 und neuer Andere Linux-Distributionen auf Basis von Debian 12 oder 13 oder Ubuntu 22.10 und neuer
|
|
AMD64 (for Intel and AMD) |
admin-companion_6.3-6_backport_deb11_amd64.deb file_download |
Kali Linux 2020.1 - 2022.03 Andere Linux-Distributionen auf Basis von Debian 11 oder Ubuntu 20.04–21.10
|
|
ARM64 (AARCH64) |
admin-companion_6.3-6_arm64.deb file_download |
Kali Linux 2022.4 und neuer Andere Linux-Distributionen auf Basis von Debian 12 oder 13 oder Ubuntu 22.10 und neuer
|
|
ARM64 (AARCH64) |
admin-companion_6.3-6_backport_deb11_arm64.deb file_download |
Kali Linux 2020.1 - 2022.3 Andere Linux-Distributionen auf Basis von Debian 11 oder Ubuntu 20.04–21.10
|
Paket für RedHat / Fedora
| Architektur | Paket | Geeignet für |
|---|---|---|
|
AMD64 (für Intel und AMD) |
admin-companion-6.3-6.el8.x86_64.rpm file_download |
 Fedora Versions 37 und neuer Fedora Versions 37 und neuer
|
Paket für FreeBSD
| Architektur | Paket | Geeignet für |
|---|---|---|
|
AMD64 (für Intel und AMD) |
admin-companion-6.3-6_amd64.pkg file_download Detached ASCII-armored GPG signature: admin-companion-6.3-6_amd64.pkg.asc file_download |
|
Installationsanleitungen
Kali Linuxund
Andere Debian-basierte Linux-Systeme
wget https://www.admin-companion.ai/static/downloads/<Ihr benötigtes Paket>
Zum Beispiel: wget https://www.admin-companion.ai/static/downloads/admin-companion_6.3-6_amd64.deb
                        wget https://www.admin-companion.ai/static/downloads/admin-companion-2025_public.key

                        gpg --import admin-companion-2025_public.key

                        gpg --verify <der Dateiname Ihres heruntergeladenen Installationspakets>
Sie erhalten mehrere Zeilen. Eine Zeile sollte anzeigen:
Good signature from "Admin Companion 2025 - ayonik GmbH <admin-companion@admin-companion.ai>"
...dann ist die Validierung erfolgreich. Sie können die Warnmeldung ignorieren. Wir verwenden eine selbstsignierte Signatur. Stellen Sie nur sicher, dass Sie den Public Key von unserer Website heruntergeladen haben.
sudo dpkg -i <Ihr benötigtes Paket>
Für Neuinstallationen (wenn Sie keine bestehende Version aktualisieren):
- Fordern Sie einen API-Key auf der API-Key-Seite in der Admin Companion Webkonsole an (Sie müssen angemeldet sein, um auf die Seite zuzugreifen).
-
Erstellen Sie die Datei
$HOME/.admin-companion/api-key(Vergessen Sie nicht den Punkt "." im Pfadnamen)
mit folgendem Inhalt
ADMIN_COMPANION_KEY="<Your API key>" -
Stellen Sie sicher, dass Ihr System dieses Ziel erreichen kann:
https://api.admin-companion.ai:443
ai "Bist Du da?
und
wget https://www.admin-companion.ai/static/downloads/<Ihr benötigtes Paket>
Zum Beispiel:
wget https://www.admin-companion.ai/static/downloads/admin-companion-6.3-6.el8.x86_64.rpm
sudo dnf install wget
                        wget https://www.admin-companion.ai/static/downloads/admin-companion-2025_public.key

                        sudo rpm --import admin-companion-2025_public.key

                        rpm -K <your downloaded installation package file name>
Sie sollten Folgendes erhalten:
<your downloaded installation package file name>: digests signatures OK
dann ist die Validierung erfolgreich.
Wenn Sie dies nicht sehen
digests
oder Sie dies nicht sehen
signatures
--> Dann ist etwas schiefgelaufen.
sudo dnf install <your needed package>
Zum Beispiel:
sudo dnf install admin-companion-6.3-6.el8.x86_64.rpmFür Neuinstallationen (wenn Sie keine bestehende Version aktualisieren):
- Fordern Sie einen API-Key auf der API-Key-Seite in der Admin Companion Webkonsole an (Sie müssen angemeldet sein, um auf die Seite zuzugreifen).
-
Erstellen Sie die Datei
$HOME/.admin-companion/api-key(Vergessen Sie nicht den Punkt "." im Pfadnamen)
mit folgendem Inhalt
ADMIN_COMPANION_KEY="<Your API key>" -
Stellen Sie sicher, dass Ihr System dieses Ziel erreichen kann:
https://api.admin-companion.ai:443
ai "Bist Du da?
wget https://www.admin-companion.ai/static/downloads/<Ihr benötigtes Paket>
Zum Beispiel:
wget https://www.admin-companion.ai/static/downloads/admin-companion-6.3-6_amd64.pkg
sudo pkg install wget
(Sie können gpg installieren mit
sudo pkg install gnupg
falls noch nicht installiert)
                        wget https://www.admin-companion.ai/static/downloads/admin-companion-2025_public.key

                        wget https://www.admin-companion.ai/static/downloads/admin-companion-6.3-6_amd64.pkg.asc

                        gpg --import admin-companion-2025_public.key


                          gpg --verify admin-companion-6.3-6_amd64.pkg.asc admin-companion-6.3-6_amd64.pkg
Sie erhalten mehrere Zeilen. Eine Zeile sollte anzeigen:
Good signature from "Admin Companion 2025 - ayonik GmbH <admin-companion@admin-companion.ai>"
...dann ist die Validierung erfolgreich. Sie können die Warnmeldung ignorieren. Wir verwenden eine selbstsignierte Signatur. Stellen Sie sicher, dass Sie den Public Key von unserer Website heruntergeladen haben.
sudo pkg install <your needed package>
Zum Beispiel:
sudo pkg install admin-companion-6.3-6_amd64.pkgFür Neuinstallationen (wenn Sie keine bestehende Version aktualisieren):
- Fordern Sie einen API-Key auf der API-Key-Seite in der Admin Companion Webkonsole an (Sie müssen angemeldet sein, um auf die Seite zuzugreifen).
-
Erstellen Sie die Datei
$HOME/.admin-companion/api-key(Vergessen Sie nicht den Punkt "." im Pfadnamen)
mit folgendem Inhalt
ADMIN_COMPANION_KEY="<Your API key>" -
Stellen Sie sicher, dass Ihr System dieses Ziel erreichen kann:
https://api.admin-companion.ai:443
ai "Bist Du da?
Gateway Software - Downloads
Release Notes
10 March 2026: Version 1.0.0
-
First publicly available version
Admin Companion-Gateway besteht aus diesen Komponenten
- Docker image mit der ausführbaren Datei
- Paket-Tarball mit
- README.md
- Installationsskript
- Beispiel Konfigurationsdateien
- ac-gatewayctl, um Admin Companion Gateway zu steuern
Für einen air-gapped Server (ohne Internetverbindung) benötigen Sie beide Dateien.
admin-companion-gateway_compose_1.0.0.tar.gz file_download
admin-companion-gateway_compose_1.0.0.tar.gz.asc file_download
admin-companion-gateway_image_1.0.0.tar.gz file_download (nur für air-gapped Server)
admin-companion-gateway_image_1.0.0.tar.gz.asc file_download (nur für air-gapped Server)
Admin Companion Gateway - Installationsanleitung
Terminologie:
- Zielhost: die entfernte Maschine, die die Quelle eines eingehenden Events ist (z. B. ein Alert) und die Maschine, zu der sich das Gateway per SSH als Benutzer
acopsverbindet, umac-opszur Analyse auszuführen.
Dieses Dokument beschreibt, wie Admin Companion Gateway auf einem Linux-Host mit Docker Compose installiert wird.
Das Gateway ist für Intranet-Deployments vorgesehen. Es empfängt Webhooks (z. B. Prometheus Alertmanager), normalisiert JSON-Payloads über Profiles und führt remote ac-ops Use-Cases per SSH auf Zielhosts aus.
Inhalt
- Voraussetzungen
- Quickstart: Alertmanager zu Slack
- Download
- Installation (Standard, mit Internetzugang)
- Installation (Air-gapped)
- Nach der Installation: Profiles und Use-Cases konfigurieren
- Zielhosts: erforderliche Einrichtung
- Betrieb des Gateways
- Deinstallation
- Fehlerbehebung
Voraussetzungen
Gateway-Host
- Linux-Host mit einer funktionierenden Docker-Installation.
- Docker Compose verfügbar als entweder:
docker compose(Compose v2 Plugin), oderdocker-compose
- Ausgehende SSH-Konnektivität vom Gateway-Host zu den Zielhosts.
Hinweise:
- Der Container läuft als Non-root UID (20102). Host-gemountete Secrets müssen für diese UID lesbar sein.
Zielhosts
Jeder Zielhost, gegen den das Gateway ausführen darf, muss Folgendes bereitstellen:
- Admin Companion installiert (damit
ac-opsauf dem Zielhost vorhanden ist) - Einen OS-Benutzer
acops - SSH-Zugriff für das Gateway (Public-Key Auth) mit Einschränkungen
- Die referenzierten Use-Case YAML-Dateien in erlaubten Use-Case Verzeichnissen
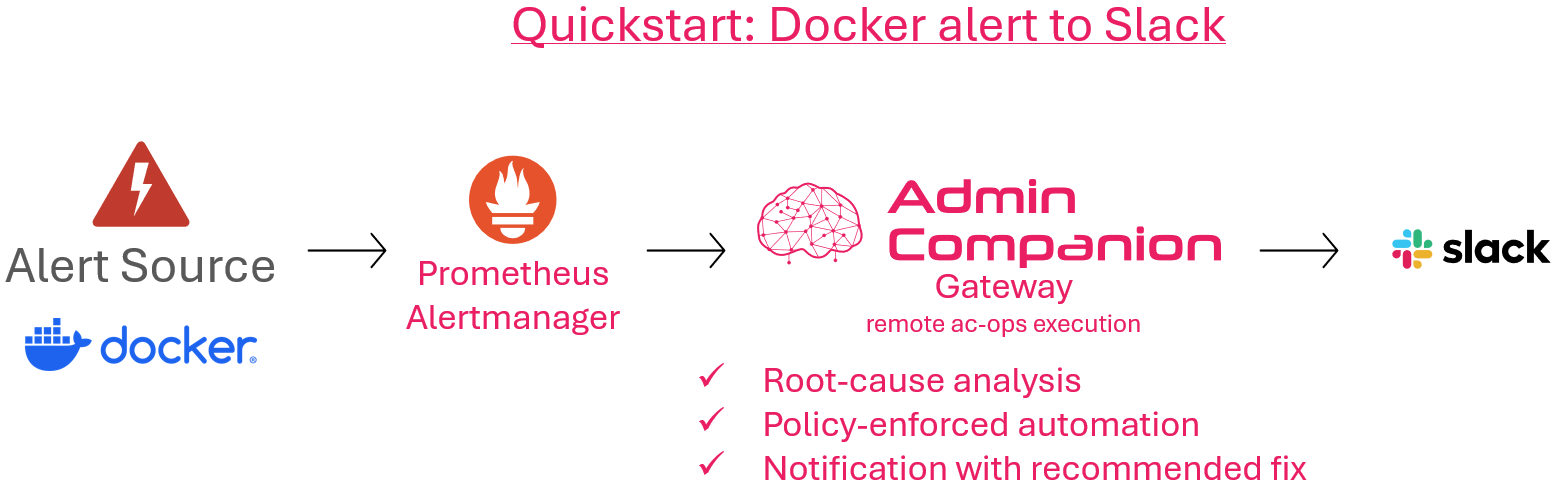
Quickstart: Alertmanager zu Slack
Dieser Quickstart verbindet Prometheus Alertmanager - Gateway - ac-ops - Slack mit dem mitgelieferten Beispiel-Profil.
Voraussetzungen:
- Prometheus Alertmanager
- Eine Slack Incoming Webhook URL
Schritte (High level):
1) Gateway installieren und starten (siehe unten).
2) Die installierte Profiles-Datei bearbeiten und die Slack-Webhook-URL setzen:
- `/etc/admin-companion/ac-ops-gateway.profiles.yaml`
3) Alertmanager so konfigurieren, dass Alerts an den Gateway-Endpoint gesendet werden.
Der benötigte Alertmanager Receiver-Snippet ist als Kommentar in derselben Profiles-Datei enthalten.
4) Sicherstellen, dass die Zielhosts vorbereitet sind (SSH-User acops, Forced-Command-Modus und benötigte Use-Cases verfügbar).
Das Quickstart-Profil nutzt docker-issue-analysis.yaml (wird mit dem Admin Companion Client / ac-ops ausgeliefert).
5) Gateway nach Änderungen neu starten:
sudo ac-gatewayctl restart
Für Konfigurationsdetails (Expression-Sprache, Sinks, Templating, Security) siehe:
https://www.admin-companion.ai/de/documentation?sub=ac-gw#ac-gw
Download
Typischerweise laden Sie eines oder beide dieser Artefakte herunter:
-
Compose-Bundle:
admin-companion-gateway_compose_<version>.tar.gzadmin-companion-gateway_compose_<version>.tar.gz.asc(optionale Detached-Signatur)
-
Image-Archiv (nur für Air-gapped Installationen benötigt):
admin-companion-gateway_image_<version>.tar.gzadmin-companion-gateway_image_<version>.tar.gz.asc(optionale Detached-Signatur)
Optional: Detached-Signatur (.asc) prüfen
Wenn Sie Detached-Signaturen erhalten haben, können Sie diese verifizieren (Beispiel):
wget https://www.admin-companion.ai/static/downloads/admin-companion-2025_public.key
gpg --import admin-companion-2025_public.key

gpg --verify admin-companion-gateway_compose_<version>.tar.gz.asc \
            admin-companion-gateway_compose_<version>.tar.gz
Wiederholen Sie das gleiche für das Image-Tarball, falls Sie es heruntergeladen haben.
Hinweis zur GPG-Warnung
Beim Prüfen von Signaturen sehen Sie ggf.:
gpg: WARNING: This key is not certified with a trusted signature!
gpg:          There is no indication that the signature belongs to the owner.
Das ist normal und bedeutet nicht, dass der Download beschädigt ist.
gpg: Good signature ...bedeutet: Datei passt zur Signatur (Integrität OK).- Die Warnung bedeutet nur: GPG wurde auf diesem System noch nicht mitgeteilt, dass diesem Signaturschlüssel vertraut werden soll (Web-of-Trust / lokale Trust-Datenbank).
Installation (Standard, mit Internetzugang)
Dabei wird das veröffentlichte Image aus GHCR verwendet (ghcr.io/ayonik-gmbh/admin-companion-gateway:<version>).
1) Compose-Bundle entpacken
tar -xzf admin-companion-gateway_compose_<version>.tar.gz
cd admin-companion-gateway_compose_<version>
2) Installer ausführen
sudo ./install.sh
Was es macht:
- Installiert den Compose-Stack nach
/opt/admin-companion-gateway/ - Installiert Konfigurations-Templates (nur falls fehlend) nach
/etc/admin-companion/ - Erstellt das Secrets-Verzeichnis
/etc/admin-companion/ac-ops-gateway-secrets/mit strikten Berechtigungen - Generiert im Secrets-Verzeichnis (falls fehlend):
- Bearer Token:
ac_ops_gateway_token - SSH Keypair:
acops_gateway_ed25519/.pub - leere
known_hosts(wird nur genutzt, wennAC_OPS_GATEWAY_SSH_STRICT_HOST_KEY_CHECKING=true; sonst ignoriert)
- Bearer Token:
- Installiert
ac-gatewayctlnach/usr/local/bin/ac-gatewayctl
3) Gateway starten
sudo ac-gatewayctl up -d
4) Status/Logs prüfen
sudo ac-gatewayctl ps
sudo ac-gatewayctl logs -f
Installation (Air-gapped)
Air-gapped bedeutet, dass die Zielmaschine nicht aus GHCR ziehen kann.
Zusätzlicher Schritt (vor der normalen Installation): das Image in Docker laden.
1) Beide Dateien auf die Zielmaschine übertragen:
- `admin-companion-gateway_compose_<version>.tar.gz`
- `admin-companion-gateway_image_<version>.tar.gz`
2) Image laden:
gunzip -c admin-companion-gateway_image_<version>.tar.gz | docker load
Falls Ihr Docker Root benötigt:
gunzip -c admin-companion-gateway_image_<version>.tar.gz | sudo docker load
3) Mit dem Standardverfahren fortfahren
- Compose-Bundle entpacken
- `sudo ./install.sh`
- `sudo ac-gatewayctl up -d`
Nach der Installation: Profiles und Use-Cases konfigurieren
Quickstart: Minimal erforderliche Änderungen (Alertmanager - Gateway - ac-ops - Slack)
Wenn Sie dem Quickstart-Profil folgen, sind dies die effektiven Änderungen, die Sie vornehmen müssen:
1) Gateway: Slack-Webhook-URL setzen
- Bearbeiten:
/etc/admin-companion/ac-ops-gateway.profiles.yaml - Tragen Sie Ihre Slack Incoming Webhook URL im
webhook-Sink des mitgelieferten Alertmanager-Profils ein.
2) Alertmanager: Receiver-Snippet hinzufügen + Bearer-Token konfigurieren
- In der Alertmanager-Konfiguration (typischerweise
/etc/alertmanager/alertmanager.yml) fügen Sie diesen Receiver hinzu und verweisen Sie auf den Gateway-Endpoint. - Die Receiver-Snippet-Vorlage ist als Kommentar in der Gateway-Profiles-Datei enthalten:
/etc/admin-companion/ac-ops-gateway.profiles.yaml
- Passen Sie den Parameter
bearer_token_filean den Pfad an, unter dem Sie die Datei bereitstellen. - Empfehlung: Kopieren Sie die Datei
/etc/admin-companion/ac-ops-gateway-secrets/ac_ops_gateway_token(voninstall.sherzeugt) an einen Ort, auf den Alertmanager zugreifen kann. - Passen Sie die Zugriffsrechte der Kopie so an, dass Alertmanager darauf zugreifen kann.
-
Die Admin-Companion-Datei hat Mode 0600 und UID:GID 20102:20102, daher können Sie nicht direkt auf diese Datei verweisen.
-
Anforderungen an das Alert-Payload (Quickstart-Profil):
commonLabels.instance(oderalerts[0].labels.instance) wird alstarget_hostverwendetcommonLabels.alertname(oderservice/job) wird zur Auswahl des Use-Cases verwendet;acopsdemocontainermissingist nur ein Beispiel-Alertname- das mitgelieferte Profil behält einen Default-Use-Case (
docker-issue-analysis.yaml), wenn es keinen Match gibt
3) Target Hosts: erforderliches Setup
ac-opsinstalliert- Benutzer
acopsmit Forced-Command-SSH-Modus (ac-ops --ssh-restricted) - erforderlicher Use-Case vorhanden (Quickstart verwendet
docker-issue-analysis.yaml)
Nach den Änderungen starten Sie das Gateway neu:
sudo ac-gatewayctl restart
Gateway-Konfigurationsdateien
Nach install.sh bearbeiten Sie typischerweise:
/etc/admin-companion/ac-ops-gateway.cfg/etc/admin-companion/ac-ops-gateway.profiles.yaml
Dann neu starten:
sudo ac-gatewayctl restart
Secrets und Berechtigungen
Secrets-Verzeichnis (in den Container gemountet als /run/secrets):
/etc/admin-companion/ac-ops-gateway-secrets/
Default Ownership Model (empfohlen):
- Verzeichnis:
0700, owned by20102:20102 - Token-Datei:
0600, owned by20102:20102 - SSH Private Key:
0600, owned by20102:20102(erforderlich für OpenSSH)
Zielhosts: erforderliche Einrichtung
1) Admin Companion Client installieren (ac-ops muss existieren)
Auf jedem Zielhost:
command -v ac-ops
Wenn ac-ops fehlt, installieren Sie das Admin Companion Client Paket, das es bereitstellt.
2) Benutzer acops anlegen (empfohlen)
Auf jedem Zielhost einen dedizierten Service-User anlegen und das SSH-Verzeichnis vorbereiten:
# Empfehlung: dedizierter Service-User ohne interaktiven Login
id acops >/dev/null 2>&1 || sudo useradd -m -s /usr/sbin/nologin acops

# SSH-Verzeichnis und authorized_keys
sudo install -d -m 0700 -o acops -g acops /home/acops/.ssh
sudo install -m 0600 -o acops -g acops /dev/null /home/acops/.ssh/authorized_keys
Wenn Ihr OS useradd nicht bereitstellt, verwenden Sie OS-spezifische Tools, um einen normalen Benutzer acops mit Home-Verzeichnis anzulegen.
Optionales Hardening (empfohlen): Forced-Command auch in sshd erzwingen und Session-Features deaktivieren:
cat <<'EOF' | sudo tee /etc/ssh/sshd_config.d/90-acops-admin-companion.conf >/dev/null
Match User acops
  ForceCommand ac-ops --ssh-restricted
  PermitTTY no
  AllowTcpForwarding no
  X11Forwarding no
  PermitTunnel no
EOF
sudo systemctl reload ssh
3) Gateway-Public-Key mit Einschränkungen installieren
Auf dem Gateway-Host befindet sich der Public Key unter:
/etc/admin-companion/ac-ops-gateway-secrets/acops_gateway_ed25519.pub
Auf dem Zielhost fügen Sie ihn an diese Datei an:
/home/acops/.ssh/authorized_keys
Empfohlene Einschränkungen:
- erzwungene, eingeschränkte Ausführung:
command="ac-ops --ssh-restricted"
- interaktive/Session-Features deaktivieren:
no-pty,no-port-forwarding,no-agent-forwarding,no-X11-forwarding,no-user-rc
Beispiel (ersetzen Sie <PUBKEY> durch die wörtliche Public-Key-Zeile aus .../acops_gateway_ed25519.pub des Gateways):
umask 077
printf '%s\n' 'command="ac-ops --ssh-restricted",no-agent-forwarding,no-port-forwarding,no-pty,no-user-rc,no-X11-forwarding <PUBKEY>' \
  >> /home/acops/.ssh/authorized_keys
chown acops:acops /home/acops/.ssh/authorized_keys
chmod 0600 /home/acops/.ssh/authorized_keys
4) Sicherstellen, dass Use-Cases existieren und erlaubt sind
Das Gateway wird (auf dem Zielhost) aufrufen:
ac-ops --ssh-restricted --use-case <name> --event -
Im ssh-restricted Modus akzeptiert ac-ops nur Use-Cases aus erlaubten Verzeichnissen.
Platzieren Sie Ihre Use-Case YAML-Dateien auf den Zielhosts in den erlaubten Use-Case Verzeichnissen (häufig unter /etc/admin-companion/ops/use-cases plus Vendor libexec Paths).
Betrieb des Gateways
ac-gatewayctl ist ein dünner Wrapper um Compose.
Häufige Befehle:
sudo ac-gatewayctl up -d
sudo ac-gatewayctl ps
sudo ac-gatewayctl logs -f
sudo ac-gatewayctl restart
sudo ac-gatewayctl down
sudo ac-gatewayctl pull
Deinstallation
Konfiguration/Secrets behalten:
sudo ac-gatewayctl uninstall
Alles entfernen (gefährlich; löscht Secrets und entfernt auch das Gateway-Image):
sudo ac-gatewayctl uninstall --purge
Fehlerbehebung
Wenn Port 8080 bereits belegt ist
Standardmäßig veröffentlicht der Compose-Stack das Gateway auf Host-Port 8080:
ports: ["8080:8080"]
Wenn Port 8080 auf dem Gateway-Host bereits genutzt wird, ändern Sie die linke Seite (Host-Port) in:
/opt/admin-companion-gateway/docker-compose.yml
Beispiel: Stattdessen auf Host-Port 18080 veröffentlichen:
ports:
  - "18080:8080"
Dann die Änderung anwenden:
sudo ac-gatewayctl up -d
Tipp: Sie können prüfen, was aktuell auf 8080 lauscht, mit:
sudo ss -ltnp | grep ':8080' || true
Gateway startet, findet aber keine Use-Cases
Symptom:
- SSH Output enthält: ssh-restricted: use-case not found in allowed use-case dirs
Fix: - Sicherstellen, dass der Use-Case auf dem Zielhost unter erlaubten Use-Case Verzeichnissen vorhanden ist. - Sicherstellen, dass der angeforderte Use-Case Name exakt übereinstimmt.
Webhook-Sink liefert HTTP 400 (z. B. Slack)
- Prüfen Sie
sink_done.detailundsink_done.paramsin DEBUG Logs. - Für Slack Incoming Webhooks muss der Request Body gültiges JSON sein (z. B.
{"text":"..."}) und sollte JSON-escaped Template-Inserts verwenden.
Debug-Logging aktivieren (Gateway)
In /etc/admin-companion/ac-ops-gateway.cfg:
AC_OPS_GATEWAY_LOG_LEVEL=DEBUG
Um vollen Request Input/Output zu loggen, zusätzlich setzen:
AC_OPS_GATEWAY_LOG_FULL_INPUT=trueAC_OPS_GATEWAY_LOG_FULL_OUTPUT=true
Wichtig: Full Input/Output Logging ist nur mit DEBUG erlaubt.